Test Development
Test Development Essentials
Your IDE
XLT test cases are usually developed in Java, as JUnit test cases. This means you can work locally, in your IDE of choice. You will probably start out with one of our sample test suites, which come pre-configured as Maven projects ready to be imported, built and run in your IDE of choice. You’ll then want to adjust some test cases to your needs, and probably also add new ones. If you need to do some functional testing, test data may be added.
Developing a Test Case
To develop a test case, start by identifying common usage scenarios for your application. (In our sample test suites, these are things like a visit to the homepage, some browsing, adding a product to the cart, searching, up to the whole ordering process).
The scenarios often share some steps, so the next step is to identify these to create flows or actions to make those common steps easily reusable in all test cases that need them (and also to make maintenance less complicated). Using a real-world example from our sample test suites, this is what we did:
                Homepage
--------------------------------------------
                GoToSignIn
--------------------------------------------
                Register
--------------------------------------------
                Login
--------------------------------------------
BrowsingFlow:   SelectTopCategory
                SelectCategory
                Paging
                ProductDetailView
--------------------------------------------
                Search
--------------------------------------------
                AddToCart
--------------------------------------------
CheckoutFlow:   StartCheckout
                EnterShippingAddress
                EnterBillingAddress
                EnterPaymentMethod
--------------------------------------------
                PlaceOrder
--------------------------------------------
                Logout
This is of course just an example and a different breakdown of flows and actions might make sense for your application. Just keep in mind that an action always represents a single test step (similar to a click on a website, although this may trigger more than one request), whereas flows can combine several of these actions to make one logical unit that may be used by several test cases. For example, with the flows and actions above, you can define several common scenarios, like the following:
- Homepage
- Homepage → GoToSignin → Register → (Login) → Logout
- Homepage → BrowsingFlow
- Homepage → Search
- Homepage → BrowsingFlow → AddToCart → CheckoutFlow (abandoned cart)
- Homepage → BrowsingFlow → AddToCart → CheckoutFlow → PlaceOrder (guest order)
- Homepage → Login → BrowsingFlow → AddToCart → CheckoutFlow → PlaceOrder → Logout (registered order)
Local Testing and Test Consolidation
XLT tests are basically JUnit tests; they can be run (and debugged) from the IDE. This should be done repeatedly while consolidating the various tests you have written until a high level of stability is reached. Load testing necessitates stable and predictable test runs. Otherwise you will keep running into functional test errors and this can ultimately give you a false picture of your system’s load capabilities.
For load testing, you usually want some randomness in your scenarios. For example, instead of always clicking the same category, it better mimicks real-world behavior to randomly pick categories from the pool of all available categories. With XLT, you can easily achieve this by using XltRandom.nextInt(). Furthermore, when using this method, you can re-run single test cases with the exact same “random” input as before! This can be very helpful during the consolidation and debugging of your test suite. By setting the property com.xceptance.xlt.random.initValue you can replay a test case exactly as it was executed previously (make sure to put this in dev.properties, as this value should be used for debugging purposes only and will make your loadtest not very random at all if you forget to remove it from the other property files later). The value to be used can be found at the end of test case’s console output and also in the result browser (when clicking the test case title):
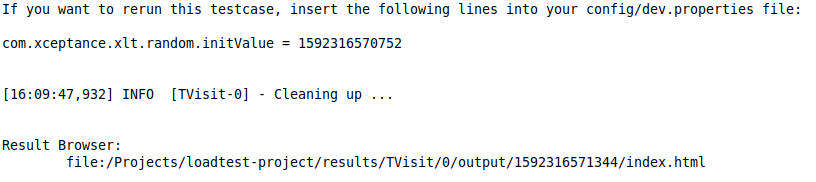
Console output for local test run
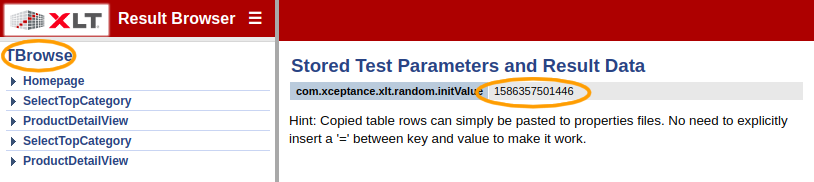
Result browser overview page
Especially when you are using randomness in your tests (which you should), we encourage you to run your tests several times for consolidation, as different random test behavior might yield different results. You can also overwrite test properties for development only, for example to define probabilities for test behaviors in order to make sure every option is working (for example: in a “real” test setup, you’d want your tests to open the quickview instead of the product detail page in about 50% of all tests, but during development you might want to temporarily set the quickview probability to 100% while you are working on the quickview behavior).
For test error analysis, the console output offers many insights, but it is probably easiest to have a look at the result browser generated for the test (the link is also found at the end of the console output, see above). While your main focus is probably the last executed action and the reason why it failed, don’t forget to also check what happened before: as you want to model real-world usage of your application in your tests, the actions (and the requests they trigger, and the data sent and received by those requests) should be as close to what happens during manual application usage as possible.
📝Latest Result Browser
XLT offers a shortcut for always getting the latest result browser of any given test case: for instance instead of opening
file:/Projects/loadtest-project/results/TVisit/0/output/1592316571344/index.html
just cut it down to
file:/Projects/loadtest-project/results/TVisit.html -
that way you will always see the latest test run, just by refreshing the result browser.
Continuous Integration
Test automation is an important part of continuous integration (CI). XLT effectively supports CI.
Since XLT uses JUnit, you can run your tests with any CI tool that supports JUnit. We recommend using Jenkins or Bamboo.
XLT provides a Jenkins plug-in that makes it easy to run your load tests with Jenkins. The plug-in also provides trend reports and success criteria evaluation.
Basic Rules for Test Development
If you prefer to name your test cases your way or use the package mapping to structure your test cases, you can build your own naming strategy. Just overwrite the method getTestCaseName in AbstractTestCase.
The test case mapping can be configured in project.properties. Please see Glossary for details.
Test Data
It’s good practice to separate test logic and test data. Therefore, XLT supports separate data sets for test cases.
XLT uses the name of the test case to look up test data in the config/data directory. If you have a test case named TAuthor, XLT looks for a file TAuthor.properties in config/data. If you have a package-based name like com.company.test.TAuthor and mapped it to TAuthor (default mapping), it will also look for TAuthor.properties. If you used the com.company.test.TAuthor=TAuthor mapping, it will look for TAuthor.properties in config/data.
The properties file is a standard Java properties file. It supports correct handling of non-ASCII characters.
Data Sets
Often you want to run the same test case with different data. To do this, you can define multiple data sets in one property file. To separate the data sets, XLT uses the notion of keys. A key is a unique identifier for a data set.
The key must be separated from the property name by a dot.
dataset1.c.password = secret
dataset2.c.password = secret
XLT automatically detects the available keys and runs the test case for each key. If no keys are found, the test case is run once.
The keys can be any string. If you want to run a test case for a specific customer, you can use the customer ID as part of the key.
1000.c.password = secret
1001.c.password = secret
By default the key is randomly chosen from the available keys. You can configure the data set selection strategy in project.properties. Please see Glossary for details.
- Do not overload the test cases. Focus on the (one) key purpose of the test case. It is better to create a lot of short tests than only a few large test cases that cover many features. This helps to maintain and debug the tests and it is also much easier to locate the root cause of real problems if a test case fails.
- Do not test the same feature again and again. If possible, do not test the same feature again and again in several test cases. Instead find the shortest way to get to a specific page! For example when testing different shopping bag or checkout features in several test cases, try to avoid searching for a product and browsing to the product detail page. Instead, start the test case by opening the product detail page directly. That way, if something happens to the search functionality, only the test cases covering search will fail. If search is used in all the test cases, then all of them will fail and the issue will be more difficult to debug.
- Use flows to perform repeating sequences. If you realize that you’re using an identical sequence of several calls more then once, then think about extracting it to a flow. Not only does it save you time when creating the test cases but also makes maintenance much easier. Adjusting an xpath will only have to be done once in the flow instead of repeating fixes in each single test case. For example logging in or adding products to cart are typical sequences that have to be done in many test cases and are worth creating a flow.
- Be consistent in using the flows you created. For example, do not perform logging in using the flow in some test cases and without using the flow in other test cases. Otherwise you will lose control.
- Add comments to your test cases and use meaningful names. Write comments to document the purpose of each test case step while you still remember it. At least describe the target element with a clear name. Reading and understanding a test case for maintaining or debugging purposes can be tricky if you just see
HtmlUtils.findSingleHtmlElementByXPath(page, "html/body/div[3]/div[2]/div/ul/li[2]/a"). It definitely helps to read a comment like Click ‘Login’ button. - Clean up at the end of your test case. For example, after adding products to cart or addresses to address book make sure that the test case itself removes them at the end. Make sure each test execution starts under identical conditions. Validations may fail for the second test run if the previous one did not clean up all its artifacts.
- Be prepared if the previous test run did not clean up and add some randomization where needed. Test cases may fail because they try to add something that already exists. A previous test case might add something during a failed test run that has not been finished (and therefore the clean up at the end of the test case has not been performed). Try to access objects or list entries randomly, so even in the case the clean up did not work properly, the next execution might at least have a chance to pass.
- Use robust xpath expressions. Xpaths or generated IDs are likely to change. To avoid test case maintenance after a new build of the tested application you should use target element locators that are as unspecific as possible while still being unambiguous, so there is a good chance it will hold even if some part of the application changes. For example for a cart link, instead of
html/body/div[3]/div[2]/div/ul/li[5]/div/div[3]/div[1]/div/ait’s better to use something like//div[@id='cart']/div[1]. Finding elements by ID is easiest, of course, and should be used whenever possible.