User Accounts
Creating a User Account
To use Xceptance Test Center, you need a user account. You can easily sign up on https://xtc.xceptance.com/. You will be prompted to enter your name, mail address and password. Alternatively, you can sign up using your Google or Microsoft account.
Password Guidelines
- Your password for XTC has to be at least 12 characters long.
- A password must not start or end with spaces.
- If the password is shorter than 15 characters, it must contain at least one of each: lowercase and uppercase characters, digits, and special characters (e.g. punctuation).
After the successful registration, XTC will send you an email to the given address, asking you to confirm the registration. You will be able to log in to XTC as soon as you confirmed.
Currently, your role and projects will be assigned by Xceptance. This will change in the future.
Notifications
XTC users will get notified by email whenever their membership in a project or organization has changed:
- when they have been added to or removed from an org or project,
- when their org or project role has been changed, or
- when they have actively been locked or unlocked by an org admin.
Account Management
XTC enables you to manage your account information. After logging in, click your avatar on the right side of the header and go to My Account.
The My Account view contains two tabs: Profile and Security.
In Profile you may update your profile information such as your first and last name, your phone number (which may be useful for receiving monitoring notifications), and you can also upload an avatar/profile picture.
In Security you can update your login data: to set a new e-mail address or password for your account, you need to enter the new data twice and confirm this with your current password. (If you are using an external provider for authentication and have not set up an additional XTC password for your account, entering the password will not be necessary, and you will only be able to update your account’s e-mail address.)
In addition to securing your account with a regular password, you may set up time-based one-time passwords (TOTP) as a second factor (2FA) here.
External login providers for this account will be listed here and if you want to switch from internal authentication to using an external provider, you can connect your XTC account to an external login provider here.
Organization admins may impose mandatory login requirements on users of their organization. They may require users to be authenticated using specific login providers or 2FA. Read more about this here.
Two-Factor Authentication (2FA)
It is possible to secure your XTC account not only with a regular password, but also with a second factor. Currently, XTC supports time-based one-time passwords (TOTP) as the second factor. Use apps like Twilio Authy or Google Authenticator on your phone to generate such passwords. 2FA is optional at the moment, but we recommend that you set up 2FA for your account right now.
To enable 2FA for your XTC account, go to My Account > Login Data. In the section Two-Factor Authentication, click the button Enable Two-Factor Authentication and follow the instructions to set up your preferred TOTP app on your phone. When this is done and you want to sign in to XTC again, you will first have to enter your regular password as usual, but afterwards you will now be prompted to enter the second factor, a one-time password. Use your TOTP app to generate that one for you.
Note that if you are using an external login provider to log in, XLT will not ask you for a TOTP as in this case 2FA is managed in the settings of your external account.
If you later need to disable 2FA, simply click the button Disable Two-Factor Authentication and confirm with your password and a valid one-time password generated by your TOTP smartphone app (or a valid recovery code).
XTC system administrators are required to have 2FA enabled for their local XTC account.
2FA Recovery Codes
XTC allows you to create new 2FA recovery codes at any time. Use this feature if you lost your recovery codes or used them all up. To create new codes, go to My Account > Security > Two-Factor Authentication, click the button Reset Recovery Codes and follow the instructions. The 2FA setup on your authentication device will not be affected.
External Login Providers (SSO)
XTC supports authenticating users using their Google or Microsoft accounts. This allows users to use their existing Single-Sign-On accounts without having to remember additional login credentials.
Sign Up Using an External Provider
To sign up with your Google or Microsoft account click on the appropriate button in the registration form. This will forward you to your preferred provider to log in.

Registration form with buttons for external login providers
Note
Depending on whether you are already logged into your Google or Microsoft account, you may not see any indication of being redirected at all. The provider may redirect you back into XTC immediately without showing any login interface at all.
Upon return XTC will continue the signup process by requesting additional information like your full name and email address. After confirming, you will receive a validation email to the given address to complete the signup, before your account can be activated.
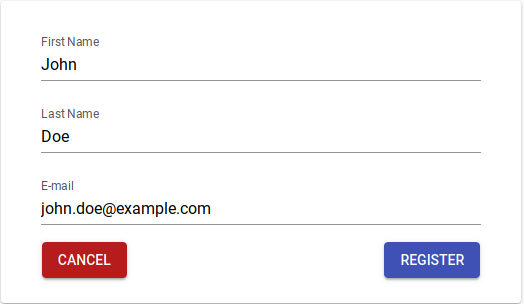
Registration details form pre-filled with data from the login provider
Note
The details form may already contain the details returned by your login provider. You are free to change those details. XTC will not use any of the supplied information to connect your XTC user to your external account. It will, however, use the supplied email address as your point-of-contact for any kind of notifications from the system (e.g. test results). Please refer to your organization’s guidelines regarding the correct email address to use for this kind of data.
Warning
The supplied email address MUST be unique. DO NOT use shared addresses (e.g. mailing lists), because other users will be unable to register with the same address.
Connecting Existing XTC Accounts to an External Login Provider
If you already have an existing XTC account, you can connect it to an external login provider in order to use your existing Single-Sign-On account instead of previously defined XTC login credentials.
-
Click on your avatar in the top right corner and go to “My Account” > “Security”.
-
Edit the “Single Sign-On” section by clicking on the pen icon.
-
Select your preferred login provider via the appropriate button.

UI to connect existing accounts to external providers. The user in the example is already connected to a Google account. Therefore the Google button is disabled.
XTC will redirect you to your provider to complete the login process. Upon return your XTC account will be connected to your external provider.
Note
Depending on whether you are already logged into your Google or Microsoft account, you may not see any indication of being redirected at all. The provider may redirect you back into XTC immediately without showing any login interface at all.
Note
When binding your XTC account to an external account, any previously set XTC password remains intact. This means you can use both your XTC login data or your external account to sign in.
Login Using an External Provider
If your user account is set up to use SSO (see above for how this is done) you can log in using external login providers:
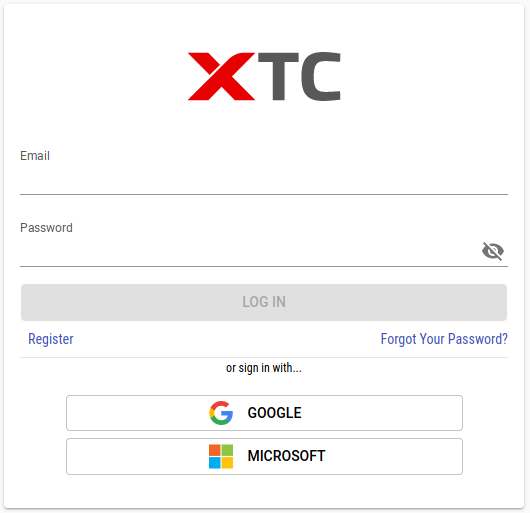
Login form with buttons for external login providers
To log in using either your Google or Microsoft account click on the respective buttons in the login form. This will forward you to your login provider and perform authentication there.
Note
Depending on whether you are already logged into your Google or Microsoft account, you may not see any indication of being redirected at all. The provider may redirect you back into XTC immediately without showing any login interface at all.
Removing the Binding to an External Login Provider
XTC allows you to remove the binding of your account to an external login provider and go back to authentication by username/password. To do this, your account needs a password first.
Users that signed up with an SSO account typically don’t have an XTC password yet and therefore need to set up one first by using the Forgot Your Password? mechanism on the login page.
To then unbind your SSO account and only use the newly created password for future logins,
- Click on your avatar in the top right corner and go to “My Account” > “Security”.
- Edit the “Single Sign-On” section by clicking on the pen icon.
- Click Remove External Login Provider. You will be prompted to enter your password to confirm this action.